GETTING INTO A TRIKE
 Simply getting in and out of a recumbent trike can be a little intimidating if you’ve never done it before. However, it doesn’t have to be if you follow these few easy steps. First of all, always make sure your trike’s brakes are locked to prevent it from rolling when you are entering or exiting it.
Begin by straddling the “boom” of the trike. The boom is the front tube extending in front of the trike and attached to it are the crankset and pedals. Approach the trike from either side in front of one of the front wheels and step over the boom with one foot with your back facing the front of the seat. Then move back toward the seat until you are in a position to lower yourself into it. Use the wheels and/or the edge of the seat frame as aids to guide and support you and ease yourself down onto the seat. It is a good idea not to “plop” yourself down into the seat as that can introduce very high instantaneous loads onto the seat frame, which can lead to premature seat frame failure. NEVER use the handlebars on linkage steering trikes to support your body weight (see more info on “Steering a Trike” below) as they are not load bearing members of the trike and can be damaged with the stress of trying to support you. You may, however, use the handlebars on all direct steer models (trikes with one tie rod) as supports. We also offer our optional VersaBars which bolt onto our direct steering trike handlebars to aid in ingress and egress. To exit the trike lock the brake(s) and reverse the process.
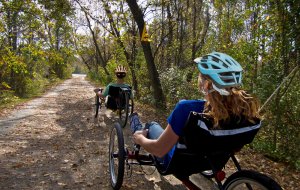
PEDALING A TRIKE
 We recommend that every trike be equipped with some sort of foot restraint to make sure that each of your rides is safe and trouble free. Clipless pedals, PowerGrip pedals or our heel strap pedals are great ways of keeping your feet securely on the pedals. Failure to keep your feet securely on the pedals, which could be caused by a bump, pothole, driveway/sidewalk/street crossing, etc. on your route, could result in your foot slipping off of the pedal(s) and getting caught between the trike and the ground. This could ruin an otherwise great ride and can sometimes cause moderate to severe injury.
The other advantage to attaching your feet directly to the pedals is that it allows you to get more power out of each pedal stroke. Not only do you get the push on the forward stroke, but you get the pull on the back stroke (if you so desire). This results in a more even cadence and less effort to propel your trike. Also, because you do not have to worry about tipping over when you come to a stop (as on an upright bike), you can simply stay clipped or strapped into the pedals when you stop.
Always use the appropriate gear for the speed and effort you’re exerting. Using too low of a gear can result in what is known as “spinning out” of a gear where you are pedaling faster than is comfortable for you. This comfortable cadence (“cadence” is how fast you are spinning your pedals and it is measured in RPMs of one pedal’s full rotation) varies from person to person as some people like to spin their pedals faster and some like a more leisurely pedaling speed. Shift to a higher gear to reduce your pedal speed. Conversely, climbing hills or starting off from a stop in too high of a gear can be difficult and can also be damaging to the trike’s drive train. Always try to use a lower gear when starting from a stop or climbing hills. To do this you need to learn to anticipate when to downshift as you climb hills and/or come to a stop so that you are in the appropriate gear for a given grade.
STEERING A TRIKE
 TerraTrikes come with one of two different steering mechanisms: Direct steering or Linkage steering. Only our Tandem Pro features linkage steering, but it is easy to recognize because it utilizes two tie rods instead of just one. Linkage steering is sometimes described as a sort of “power steering” because of the mechanical advantage you gain with the longer lever arm of the handlebar and the center pivot of the steering assembly on these trikes. Linkage steering uses two tie rods to “link” the two wheels to a center pivot to which the handlebar is attached. Because it is somewhat easier to steer, a rider can easily control the trike with a single hand.
Most of our models feature our Direct steering mechanism. In this configuration, the handlebars are attached directly to the steer tubes of the hubmounts (similar to the way bicycle handlebars are attached to front forks) and the wheels are connected to each other with a single tie rod for a sportier, more responsive feel to steering inputs. People liken this type of steering to more of a sports-car type of handling because steering is more responsive to rider input.
Both types of steering take a little time to get used to and you will, in short order, begin to understand how your trike responds to your steering inputs. When taking corners, it is recommended that you lean into the inside of the corner and not use one brake lever but rather both, simultaneously. Failure to lean in, especially at higher speeds, can result in lifting a wheel or, in the worst case scenario, losing control and potentially rolling the trike.
Always learn the dynamics of your trike at slow speeds to get the feel of it before riding at higher speeds. Sudden steering inputs will result in unpredictable handling and can result in a loss of control and possibly a crash. Be careful!
CHANGING GEARS
 Depending upon which model you choose, TerraTrikes come with a variety of gearing options. However, we really only offer two different types: Internally geared hubs and traditional derailleur-type systems.
Internally geared hubs (IGH) are maintenance free, easy to use options. Changing the gears is as simple as just twisting the gear shifter on the handlebar and continuing on your way. There is no need to even know what gear you are in. Just shift up or down to maintain a comfortable pedal speed. Internally geared hubs can come in two varieties, step or steeples. Step IGH actually change gears, but internally. So, when changing gears just stop pedaling for a moment, shift and, when you resume pedaling, you will feel that the gear has changed. Stepless IGH means no gears change at all, so you can shift while riding, stopped, or under a full load. A nice advantage of this type of drive train is when you come to a stop after being in a higher gear and have forgotten to downshift. All you have to do is shift to a lower gear and you will start off in that newly selected gear. Elegant simplicity.
The traditional derailleur-type system (externally geared drive train) is what most people are familiar with. These have a cluster of several different sized cogs on the rear wheel with a shifter to control them and anywhere from one to three gears on the front crankset with its own shifter if so equipped. This type of drive train generally has a wider range of gears to choose from when compared to an IGH. With derailleur systems, a common issue among new riders is something called “cross-chaining”. This occurs when the smallest rear cog and smallest chainring up front or the largest rear cog and the biggest chainring up front are selected at the same time. This causes too much slack or too much tension in the chain and can reduce the lifespan of your components, cause your chain to derail or, in extreme cases, rip the rear derailleur off of your frame. And no one wants THAT to happen! So please don’t cross-chain. Your trike will thank you.
There are a few key highlights to proper shifting techniques with derailleur systems. The main hurdle is timing. Most people wait too long before shifting into an easier gear. Especially when climbing a hill, it is necessary to shift before you think you need the lower gear. If you wait until you can no longer push the harder gear then the load on the chain will be too high to allow it disengage from the gear it is in. To allow the chain to move easily from gear to gear it is sometimes necessary to reduce the load on the chain. This is achieved by backing off the pedal pressure (soft pedaling) so that you can engage a lower gear. At this moment the chain has less load on it and will shift smoothly. But you MUST keep pedaling while shifting with this type of drive train.
TRANSPORTING A TRIKE
 Transporting a trike or trikes is not a difficult as one imagines. First of all, always use a method that is recommended for recumbent trikes. There are several different bike carriers out there, but they often do not support a trike properly and securely. You can get advice from the place where you purchased your trike.
The first and most recommended method is to just ride your trike to where you want to go. That’s the reason you bought a trike, isn’t it? However, we understand that there are situations in which that may not be possible (heavy traffic or unsafe roads) or that you need to transport your trike a long distance for a group ride or vacation.
The biggest transportation misconception is that trikes will not fit into a standard car. Untrue. Our Rover model will completely come apart into four pieces (albeit with some time, tools and mechanical aptitude) and can be easily transported in the back seat or trunk of any sedan. Our Traveler model folds and can be easily transported in most vehicles. Minivans, SUVs and many hatchbacks can transport trikes without any disassembly; although seat removal sometimes facilitates matters.
The other option is to use a hitch rack or roof rack. There are many options available on the market that allow for easy loading and unloading and secure transport without sacrificing any space inside your vehicle. We always recommend that you take off the seat when doing this as the wind can damage the seat over long drives and it will also reduce you gas mileage.